

Thursday, February 28, 2013
Back to Christmas....
Back before Christmas....when winter was just starting, my sister in law, Charrity asked me if I could make her some crochet headbands for her and the girls.
 After looking at the picture she wanted, this is what I came up with. I am not sure how well they worked. When I was there for Christmas we didn't have much time to chat. I made them black and white due to her request. Morgan, her oldest loves zebra print. Then Dallie follows her sister in everything and likes black and white too!
Wednesday, February 27, 2013
Bubble
There are so many faces to this little boy, also known as, Bubble! It seems as if no matter what, when I ask him to smile it looks like a grimace! I guess I should be used to it, since his older brother Brandon is the exact same way!!


He loves my ipad and is always asking to play it. I have currently gone through 4 different ipad chargers within the last 6 months, yes 4 of them! So we are taking a break from the ipad for some time (Brandon and Nathan too).

I love all of my boys and find myself grateful every day for them. Even though it's not always easy and being a Mother has been the hardest thing I have ever done, I am glad that I am these boys' Mom!
Monday, February 25, 2013
Cub Scout
Back in July when Nathan turned 8 years old, he also became a cub scout!
 He has been waiting for this day since Nathan joined the cub scouts when he was eight.
 So far he is loving it and enjoys going every week. Even though it's been over 6 months since he first joined it seems as if time has flown by! We are about half way with all of our achievements, so we are doing good. We have until he turns 9 years old to earn his Wolf badge. Isn't he an adorable cub scout?


Saturday, February 23, 2013
Home Sweet Home
Several months ago I got an email from the Moda Bake Shop workers asking for our quilts that we had made for the Bake Shop. They wanted to display some of them at a booth in South Africa. I wasn't going to send any at first, but then changed my mind. They were gone for several months but back in September I got them back!
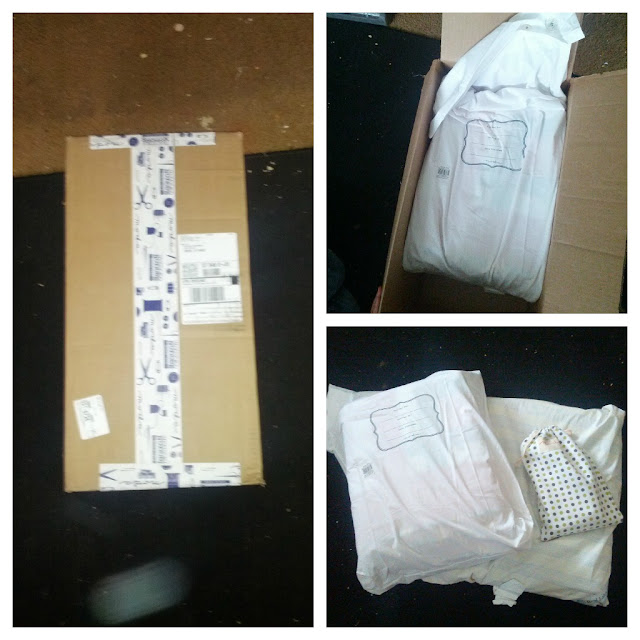 First I only sent 3 quilts in a garbage bag. Yes, very high tech and wrapped well! But I received my quilts back in these nice Moda Home quilt bags!
 After opening my bags I found my beautiful quilts! And then I also received a few gifts as a thank you! I got 3 different charm packs, 2 eye glass cleaners a charm pack tin holder and a little bag! I felt very special and loved my gifts!
 Probably even more special than the gifts was to see these little tags on my quilts! It made me feel professional for the first time! Here is my Field of Tulips quilt. They had a picture of the quilt on the front and then the ingredients on the back. This was my very first Moda Bake Shop tutorial.
 Then my Robot Love quilt. They chose awesome fonts for it! Why didn't I think of that?
 And then my Girl Salt Water Taffy quilt. I chose these three because they were the ones that I had! I tend to give away my quilts that I make. You would think with the number of quilts I make that I would have a closet full, well yes I have a closet full (the top half) but I just can't help but give my quilts away. It makes me happy to know that someone else will love and cherish my quilts, that are all made with love!!


Friday, February 22, 2013
Spray Basting Tutorial
I want to share my favorite way to baste a quilt....spray basting! I started doing this about a year ago and will NOT go back to pinning my quilts unless forced to!
Hopefully this tutorial will help you with your quilting to make it easier, more fun and faster!

 1. Lay your quilt back on any flat surface and tape it down. You can use masking tape or any other tape you may have. You just want to make sure that it is secured firmly to the floor. I like to do this in my living room because 1) it is the only place large enough I can lay a quilt flat on the floor and 2) the carpet adds a little more padding to my knees.
 On the corners I double secure them. You want to make sure that the quilt back is secured to the floor, so that if you need to rearrange your layers you can pull them off and mover them without your backing coming off the floor.
If you don't think you need this much tape, it only takes once for you to have to "re-tape" the entire backing to make sure that you add enough tape the first time.
With it firmly secured to the floor, this will guarantee that the back of your quilt has no puckers or gathering when you quilt your quilt. Before when I used pins, I would always end up with a pucker or two, but since spray basting I no longer have that problem!
 2. Once your backing is secured, lay your batting (of your choice) onto the backing. Make sure that the batting is where you will want it when finished.
 3. Trim the batting to the size of the backing. If your backing is considerably larger than your quilt top, you can lay your quilt top on top of your batting to get an idea of how of where it will lay, then trim you batting accordingly.
I have found that I like to make sure that I have plenty of room for movement. When spray basting you might get your quilt twisted slightly or you might find that your quilt top once spread out evenly is larger than you realized. I just like to be prepared. I hate going back and have to add more batting to any area because I didn't allow enough room for movement.
 4. Once you have your batting trimmed to your desired size, starting in the middle of the quilt fold back one half of your batting. You always want to start in the middle of the quilt and work outwards. If you start at the top/bottom or at the sides you might end up having everything shifted too far in any area. I also find it easier to begin in the middle.
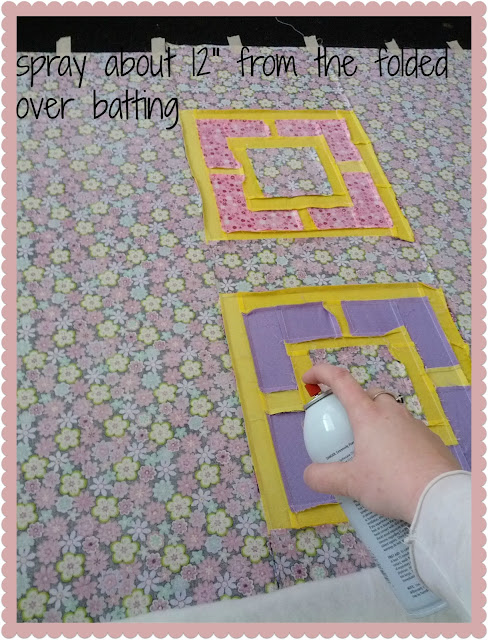 5. I then kneel in the middle of my quilt and have the batting folded back onto my lap (you don't want to sit on it because we will be spreading it out in a moment. I then use an even spray up to 12 inches above the batting. If you are doing this for the first time, you may want to do smaller sections until you get the hang of it.
You may also not be able to see where you have just sprayed very well. Just eyeball it the best you can and make sure that you are actually spraying the fabric.
 6. Once I have sprayed a few inches above and across the backing (or where ever your batting will be - this is why you laid out your batting before hand to know where you will need to spray). Make sure you have a good layer of spray down. As you keep doing this you will find that you used too much or too little, just stay flexible and learn as you go. Now lift UP the batting (your holding down the other portion of the batting with your knees) and lay down the batting in one movement. I then move to the right or left (it doesn't matter) and repeat the process as I did for the middle. Keep going until you have the batting on all the portions that you just sprayed.
 As you go along make sure that you smooth out the batting to make sure that there are no little puckers or gatherings. If you find a pucker or gather, simply lift it back up (another reason why we tape really well) and lay it back down. You shouldn't have to respray if you rearrange it once, but if you have to do it 3 or 4 times you might have to re-spray. Just depends on how much spray you used in the beginning.
 7. Once you have all the batting attached to the backing, pull back the batting again until you reach your previous section. You will be able to tell because you will have to tug harder to remove the batting. Don't worry once you do this you will know what I mean.
 8. Now repeat the same as you did before. Spray a few inches above your batting (the spray adhesive is now holding the batting in place where you are), lift up and lay flat the batting. Continue until you reach the end of your backing or until you have used all of the batting. Once you finished one side turn around and start in the middle of the quilt and repeat the same process on the other side.
 9. When you have all the batting spray basted to your backing (I ended up using a double batting for this quilt shown. You just do the same process as you did with the first batting as you do with the second layer). Now take your quilt top and lay it out on your batting. Arrange it until you are satisfied with your alignment.
 10. Now repeat the same process with the quilt top as you did with the batting. When you spray the first section, this will determine your alignment of your quilt top, so if your backing alignment is important, make sure that you align your quilt top accordingly. (In the picture you can see the blue/white can of spray baste that I got from Wal-Mart).
 In this picture you can see where I laid my quilt top down, but ended up with a small pucker. No problem, I just lifted it back up and laid it out smooth.
 11. Now you have your quilt spray basted! As you go along, rub the quilt top smooth and this will also help with the adhesive. You will be able to tell if everything is securely adhered because you will be able to see that the quilt top is "tacked" down.
 12. Now that you are finished you can now trim around your quilt. I usually leave about an inch around the entire quilt. As you quilt your quilt the backing might loosen up (depending on how taught you taped it down) and this way I know that I will still have plenty of layers while quilting, but not enough that the edge gets caught underneath while quilting (I hate it when that happens!)
 I usually cut around the whole quilt first, then go around and pull off each section. Now sometimes I like to save the extra backing from my quilts. If you want to save yours just peel the batting off. Depending on how much spray you used, you will be able to pull it off with no problem and not have any residue left. If you do happen to have some on the fabric, just wash it and it will come off.
 Now you have your quilt completely basted and ready for you to quilt! I love how I don't have to stop every few inches while quilting to take out a pin.

Hopefully this tutorial will help you with your quilting to make it easier, more fun and faster!

This is my favorite brand/type of spray basting. I found this at Hancock Fabrics for about $15. You can also purchase this online from Wal-Mart. If I can't get over to Hancock Fabrics to get this can, I can also go to Wal-Mart and get a smaller can of spray basting in a blue and white can.
When finding a spray basting can, just try any and see if you like it. But make sure that it says "spray basting".
How To:


If you don't think you need this much tape, it only takes once for you to have to "re-tape" the entire backing to make sure that you add enough tape the first time.
With it firmly secured to the floor, this will guarantee that the back of your quilt has no puckers or gathering when you quilt your quilt. Before when I used pins, I would always end up with a pucker or two, but since spray basting I no longer have that problem!


I have found that I like to make sure that I have plenty of room for movement. When spray basting you might get your quilt twisted slightly or you might find that your quilt top once spread out evenly is larger than you realized. I just like to be prepared. I hate going back and have to add more batting to any area because I didn't allow enough room for movement.


You may also not be able to see where you have just sprayed very well. Just eyeball it the best you can and make sure that you are actually spraying the fabric.


You do not have to quilt right away, you can fold your basted quilt and put it away until you have time or whatnot. I currently have a quilt that has been basted for about a year now and the adhesive is still strong! I have also unfolded it and refolded it quite a few times and that has not affected the adhesive bond.
After you are finished spray basting you might find that you r house has a "polluted" area. Just area it out if leave it, it will go away eventually. Also you might find that you have breathed in the adhesive into your nose and find your nose all sticky. Not worry just blow your nose and all will be okay.
Hopefully this tutorial has helped you find an easy way of basting your quilts! If you have any questions please feel free to ask!
Enjoy!
Thursday, February 21, 2013
Halloween 2012
I just realized that I have never posted about our Halloween in 2012!!

Me and my cute Halloween outfit. I made this skirt last year but didn't finish it in time. I finished it and viola! I found my lovely bat headband from the dollar store!

The boys....

Indiana Jones - Brandon

Gold Power Ranger - Nathan

Red Power Ranger - Kimball

We had a Ward (church) Halloween party. I made this little guys costume, the shirt, vest, boot covers and belt. Then Travis had a lot of fun with this doughnut game.

The only pictures I actually got on Halloween were at Kimball's school! This always happens! I always forget to actually take pictures on Halloween!

Then I made these little "twister" spots for the boy's Piano teacher. She asked for a homemade twister game that she can use for her different piano parties. So I made these Halloween ones. Unfortunately they are the only ones I have made thus far! I need to start working on different other holidays soon.
Friday, February 8, 2013
Piano Lessons
At the end of September and the beginning of October Brandon and Nathan started piano lessons. 
Brandon is a natural and has been able to pick it up really quickly. He also practices without me telling him to! It's so nice! Since he is really good at memorizing, he if has a little trouble with the song or likes it, it memories it because he plays it a little more. We are talking about 5 times playing it through. He is doing a great job.

Since both are beginners and are brothers who tend to fight....we started them on a different set of beginner books. Nathan is doing a regular beginner set while Brandon being older is doing an advanced beginner book. We really lucked out and each set of books have been perfect for each boy.
Wednesday, February 6, 2013
Birthdays
In September and October we had some birthdays that we celebrated. Mine was in November but we spent the day in Sandy, at the the Festival of Trees. I'll write more about them later.
Kimball turned 5 years old in October! Man is he growing up! I tried to get him to let me put a rock on his head so that he won't keep growing, but he wouldn't let me.


Then back in September, Travis turned the big 36. Is it bad that I have a hard time remembering? And the fact that he got a simple ice cream cake too? I am having a problem when it comes to birthday cakes, but the important thing is that we are celebrating the birthdays right?


Subscribe to:
Posts (Atom)